So you’ve thought about blogging from either visiting your favorite daily blog and thinking ‘I could do this’ or seeing the millions of pins floating around on Pinterest stating all of the perks and income you can make from creating your own blog. Which isn’t a lie, I’ve loved all the perks that have come with blogging. After just a year into blogging I started averaging $5,000 a month and recently was able to have my husband quit his full-time job to stay home with us! So get started on your blog, share your passion and it could very well become a full-time income for you one day.
This post contains affiliate links. Please see my disclosure policy.
4 Easy Steps!
Step 1: Picking Your Niche
Step 2: Setting Up Your Domain & Hosting
Step 3: Installing WordPress
Step 4: Personalize Your Blog
Step 1: Figuring Out Your Niche
First off what are you passionate about? Write about that, something you love that you can write about over and over again. For me, my kids are my passion. Teaching my kids and seeing how much they learn every single day and how much I learn from them is what I share through my content. I also take my hobby which is Graphic Design and incorporate it into my niche by designing/creating learning printables for my subscribers. Once you figure out your niche then you can start brainstorming ideas for a name.
Step 2: Getting Your Domain & Setting Up Your Hosting
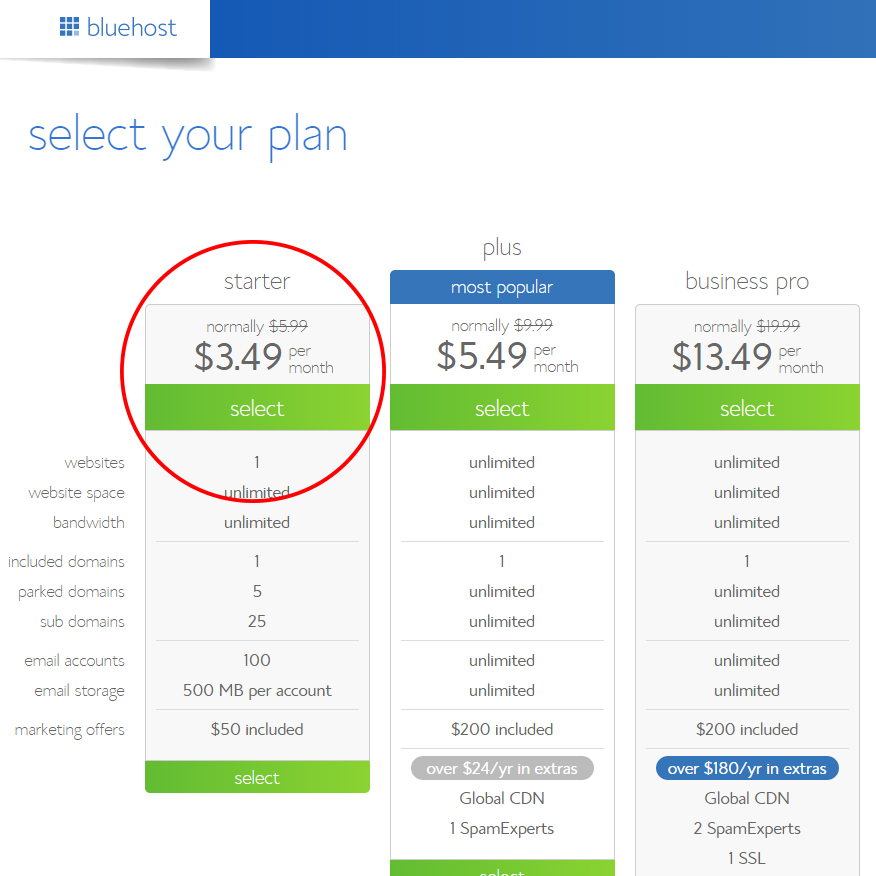
After you’ve chosen your domain name you’ll want to head over to Bluehost and get started. You can get a website host for only $3.49 per month through Bluehost, and Bluehost also gives you a FREE domain registration for a year!
After navigating to Bluehost, click on the green button that says Get Started Now. You should see a page that asks you to select your plan. For a person just starting out with their first blog I suggest going with the starter plan for now which is circled in the image below.
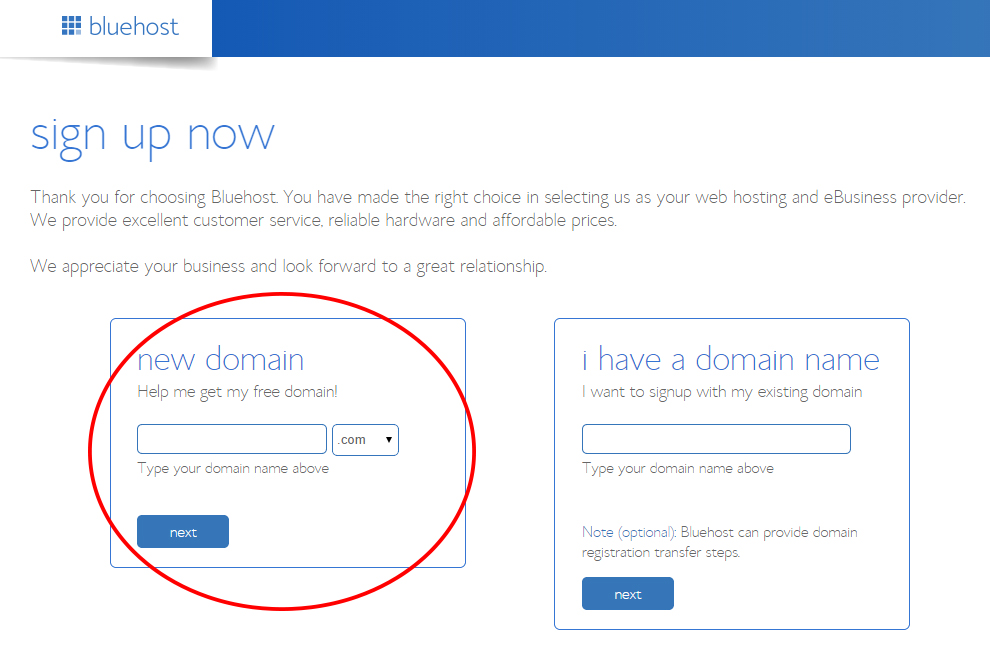
Now you will see a page that resembles the image below. Just enter the domain name you decided on in the box titled, “New Domain”. Please Note: if your domain name is already taken you will be presented with a page of alternative domains you can choose. Just scroll down and you should see the “New Domain” box where you can try out a different domain name
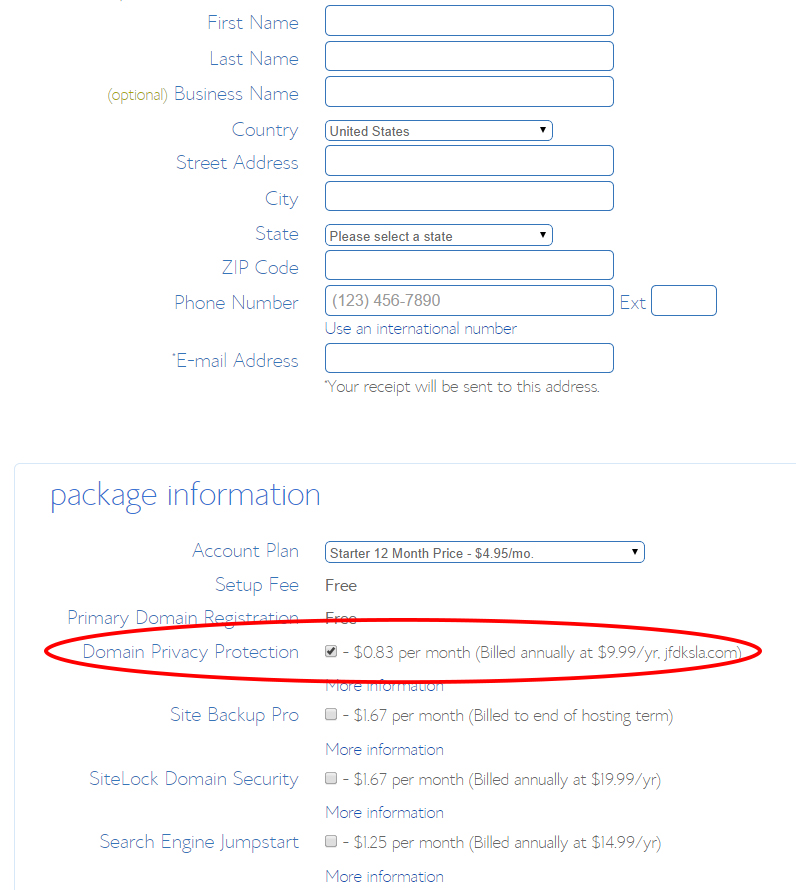
If your domain was available, you should now be required to fill your personal information. You should also be required to fill out your package information. The Account Plan can be adjusted here to meet your financial needs, along with other optional services. I recommend at least getting the Privacy Protection to protect some of your personal information.
Congratulations! You are now the owner of your very own domain! But now it is time to concentrate on getting WordPress installed so you can start creating some content and generating some income!
After logging in, navigate to your CPanel, then navigate to the MOJO Marketplace, click on one-step installs, then you will want to click on WordPress.
Click on “Start” and continue through the setup and change information where needed, for instance you may want to change you blog title (you can do this later if you don’t end up changing it now). Also make sure to write down the Admin Username & Password so you don’t forget it!
Once your done it is time to get started with personalizing your blog. Just navigate to http://www.yourdomainnamehere.com/wp-admin and enter your login credentials.
Step 4: Designing & Personalizing Your Blog
There are TONS of resources to do so whether you’d like to purchase a template there are places like Etsy and the prices range from $50 to a couple hundred. There are also free templates and plenty of free templates you can still customize. I literally have hundreds of resources when it comes to designing and customizing your blog most I have pinned on my Blogspiration board which you can view here, from everything to tips for working with brands, free social media icons, and resource links.
WordPress – For anyone without a budget, you can access a countless amount of free themes on WordPress’s Website.
StudioPress – StudioPress is a great place to check out if you are looking for premium themes. They are pretty well-established and have some of the nicest looking themes around. They also sell the Genesis Framework, which is something you’ll most likely need sometime during your blogging journey.
The Pixelista – The Pixelista is a perfect place to get a crafting or parenting theme. Their themes are aimed more towards the feminine crowd and are wonderfully built.
After choosing your theme just open your WordPress dashboard up. Under Appearance, click on Theme, then just click on Add New to begin installing your new theme.
Extras
Check out our Blogger Resources page for a huge list of plugins, marketing tools, and more! The Blogger Resources page also contains some Ad Networks I recommend like Adsense and Chitika to start monetizing your blog.
Make sure to read up on How to Improve Your On-Page SEO, so you can learn about SEO and get some tips on how to increase your traffic from search engines.
Finally, you’ll want to start setting up social media profiles on Facebook, Twitter, Pinterest, and Google+. It is best to get your social media presence started right away so you can get a head start on things like sponsored posts. When applying for sponsored opportunities they often ask for your social media followers.
Don’t forget to subscribe to our Blog Marketing Newsletter to get all the marketing tips, monetization tips, and much more!
