Hello! First off I’d like to introduce myself. I’m Jackie’s younger brother, Sean, and fellow blogger. I have had many websites that I personally owned or at least offered support for and not to toot my own horn, but I’ve got quite a vast knowledge of various internet marketing techniques along with a good bit of experience on how to properly monetize a blog in order to make the most money out of it. Since I’ve been helping my sister out a lot lately I have had the chance to explore more into marketing “mommy” blogs or other similar niches like crafting or recipe blogs. But while exploring into this area I noticed a lot of blogs in these niches don’t utilize a lot of various marketing and monetizing techniques so I figured I would offer some help with a weekly blog series where I will cover various topics that can help you get noticed along with how to get the most money out of your blog.
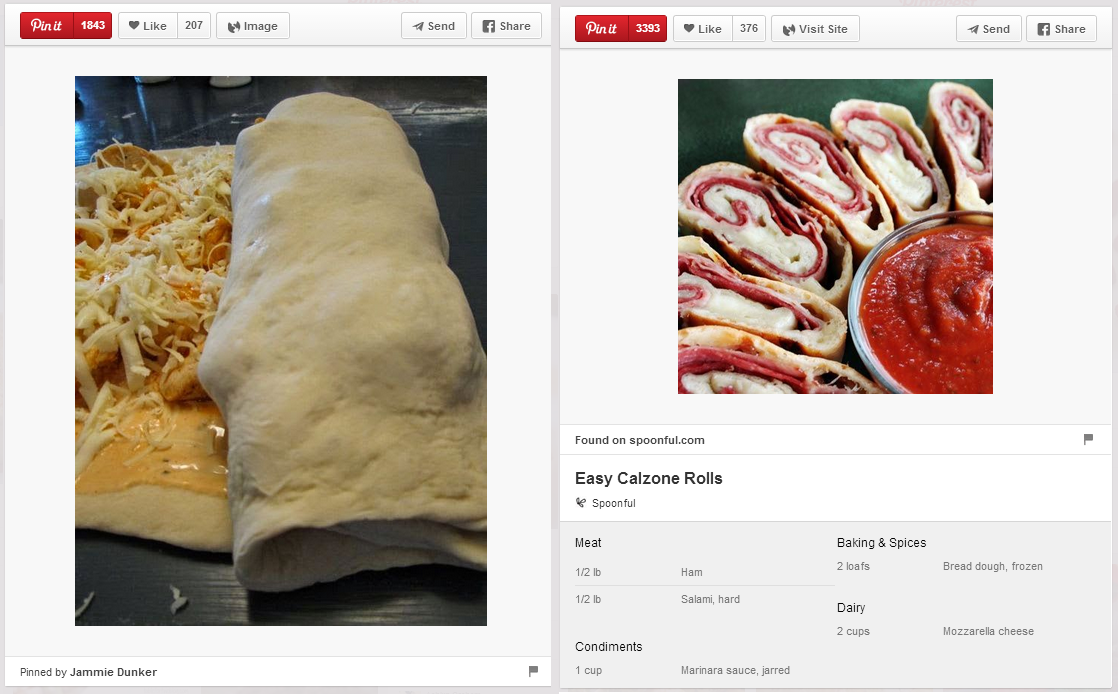
Today I wanted to cover something pretty basic that I noticed a lot of bloggers who try and utilize Pinterest forget about and that would be how to make Rich Pins for your posts instead of those bland, boring, and generic looking pins. Not only are Rich Pins more attractive but they make your pins stand out more than the regular pins that are overflowing on Pinterest. Also if your planning on selling products or providing recipes, Rich Pins can be even more beneficial. Just look at the image below that shows how a recipe is displayed as a Rich Pin compared to a regular pin.
Setting up your Rich Pins may seem like it would be rather time consuming and confusing but it is actually pretty simple especially if your already using the Blogging platforms WordPress or Blogger. First I want to show you how to make Rich Pins for your WordPress blog. If you have any questions or need any help feel free to comment and I’ll try my hardest to help out!
How to make Rich Pins for you’r WordPress blog
1. Your first step is going to be installing the plugin, WordPress SEO, you can also use the plugin, All in one SEO, but for this guide I will be using WordPress SEO.
2. After installing WordPress SEO, access the Social tab in the new SEO section on the left hand side. (Look at the picture below for help)

3. Now just make sure the “Add Open Graph meta data” is checked.
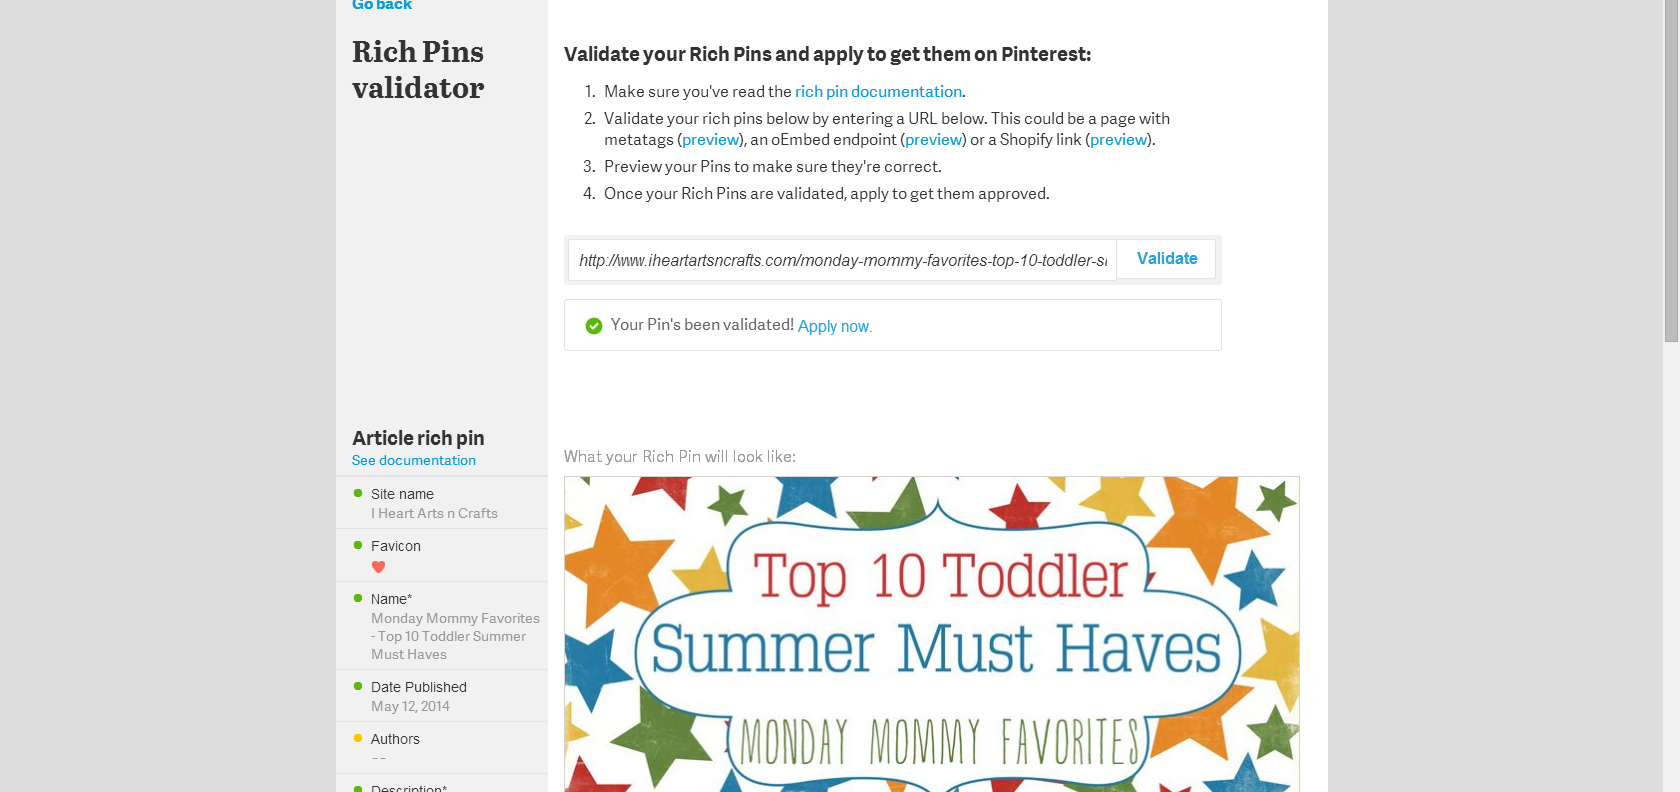
4. Lastly just head here and validate your Rich Pins (make sure all the information is coming up correctly) and if everything looks good just hit apply!
How to make Rich Pins for you’r Blogger blog
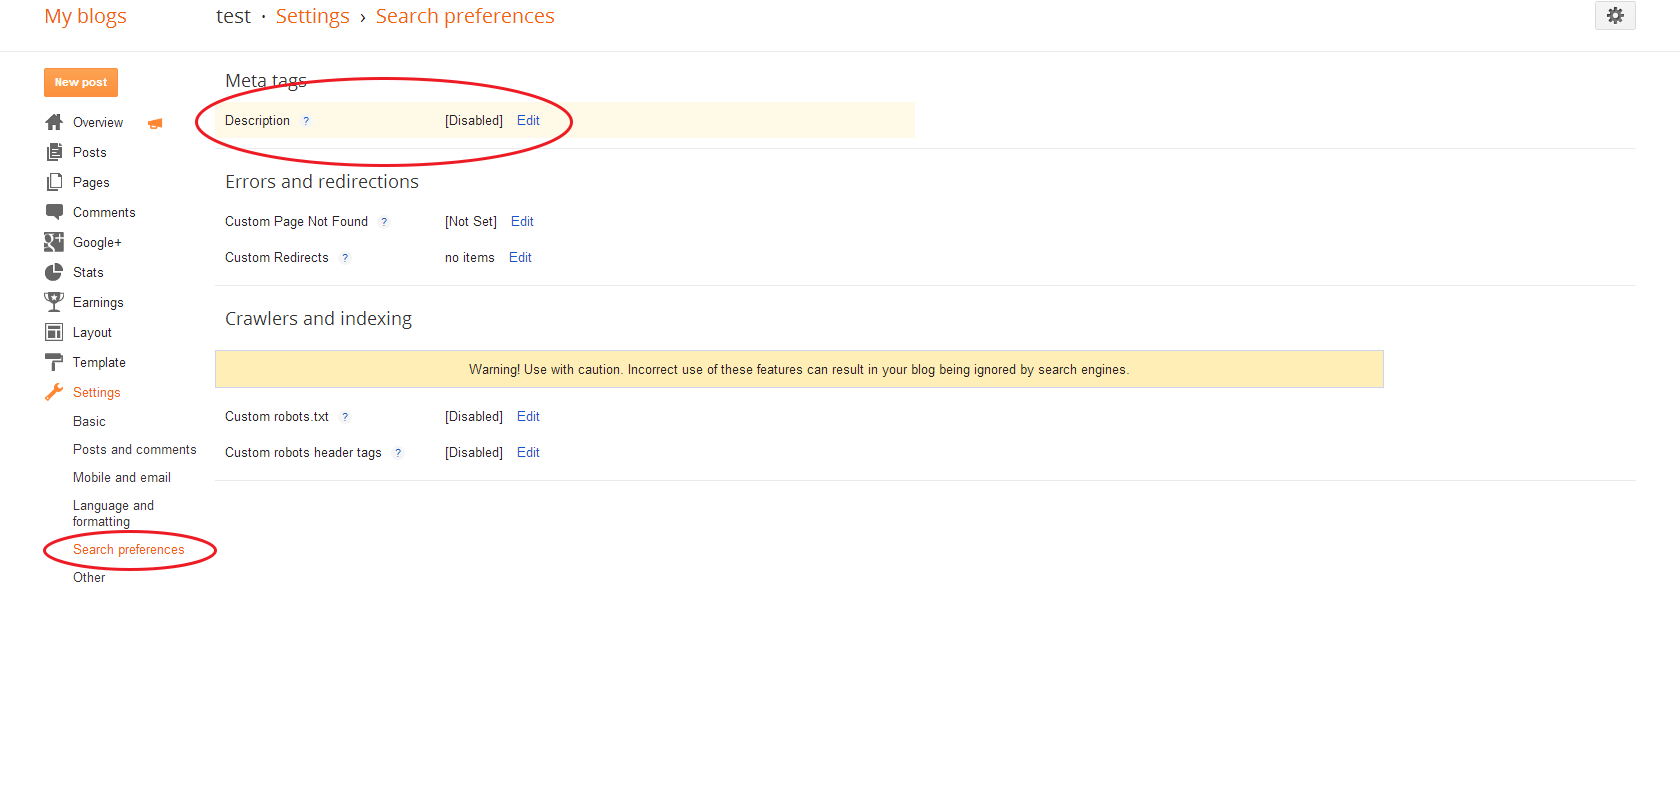
1. When you’re on you’r Blogger dashboard navigate to Search Preferences in the Settings section.
2. Enable “Description” under the Meta Tags section in Search Preferences. This is so you can add the search description for each of you’r blog posts every time you make a new one or want to edit a previous post’s search description (this will show up on you’r Rich Pins).
3. Now navigate to the Template section and click on “Edit HTML”
4. Locate the piece of code given below
<b:includable id=’post’ var=’post’>
5. Now just add in the code given below, right after the code you found (shown in previous step). Also after adding in the code change the word “Technology” in the code given below to whatever you’r blog covers, such as Recipes.
<meta expr:content=’data:post.title’ property=’og:title’/>
<meta expr:content=’data:blog.metaDescription’ property=’og:description’/>
<meta content=’article’ property=’og:type’/>
<meta expr:content=’data:blog.url’ property=’og:url’/>
<meta expr:content=’data:blog.title’ property=’og:site_name’/>
<meta expr:content=’data:post.timestampISO8601′ property=’article:published_time’/>
<meta content=’Technology’ property=’article:section’/>
<b:loop values=’data:post.labels’ var=’label’>
<meta expr:content=’data:label.name’ property=’article:tag’/>
</b:loop>
6. Finally just head here and validate your Rich Pins (make sure all the information is coming up correctly) and if everything looks good just hit apply!


What awesome ideas. I also think it’s cool youre featuring your brother. You know what would look cool for those features though? Your usual love jackie signiture but grab another color add an apostrophe-s and print brother beneath it! 🙂
This is interesting. Is there a way to do this with a WordPress blog that only uses the free version, and solely online (not software that’s downloaded?)
Sadly it won’t work with the free version since you can’t install plugins. Even without plugins you would need the ability to go in and directly edit your themes code which I don’t think you can do with the free version of WordPress. 🙁
Wonderful information, Thank you for sharing 🙂
Thanks for the tutorial! I’m clueless on how to create rich pins so I had my graphic designer do it.
I love WordPress SEO. It’s probably my favorite plugin of all. It’s really a life-saver!
Agreed! It makes my job so much easier lol.
This sounds great! I will have to sit down one day soon and try and figure it out 🙂
I never knew any of that.. thank you for taking the time to share that information with us.. I am going to check into it!
awesome tuotial! thank you so much! i recently joined pinterest and currently exploring my way around it. I love it and have been thinking of how to promote my site on it
Thanks so much for the lesson! Great info.
Great information!! Hope Sean returns with more tips!
Great tips! I am adding that WordPress plug in today!
What a great post, I think I will try this out with a little help from my husband.
Pinterest really has taken off! Pins are driving so much traffic. This is such a great tutorial!
Very informative and helpful info. Now, to make rich pins 🙂 Thanks for the advo, i’m pinning this!
I wondered how people did this, thank you!
Thank you! Does this mean that each pin needs to be validated separately?
You’re Welcome! And nope, you only need to do it that one time and once you get approved, it will change all the current and future pins from your site to Rich Pins.
Thank you! I was approved immediately!
Thank you! This was SO easy and took less than 2 minutes to do. Plus, I got approved immediately. I LOVE how the Rich Pins are retroactive. Any of my pins that meet the requirement are already Rich. Super excited. 🙂
~Lorelai
Life With Lorelai